Users and groups
Who can do this: organization administrators. You manage only the users and groups of your own organizations.
Users are the people who sign in to Pulse. Groups come in two kinds: user groups decide who a service notifies, and asset groups label related equipment on the dashboard. Both are managed on the Pulse Admin hub page (click Admin in the page header).
Users
The Users table
The Users table lists every user who holds a role in one of your organizations.
| Column | Meaning |
|---|---|
| The address the user signs in with. | |
| Name | Full name. |
| Active | Yes if the user can sign in, No if the account is deactivated. |
| Last Login | Date and time of the last successful sign-in, shown in UTC, or Never. |
| Timezone | The timezone used to display times to this user. |
| Actions | Edit opens the user editor below the table. |
Lab Monitors staff accounts are not listed and cannot be edited by organization administrators.
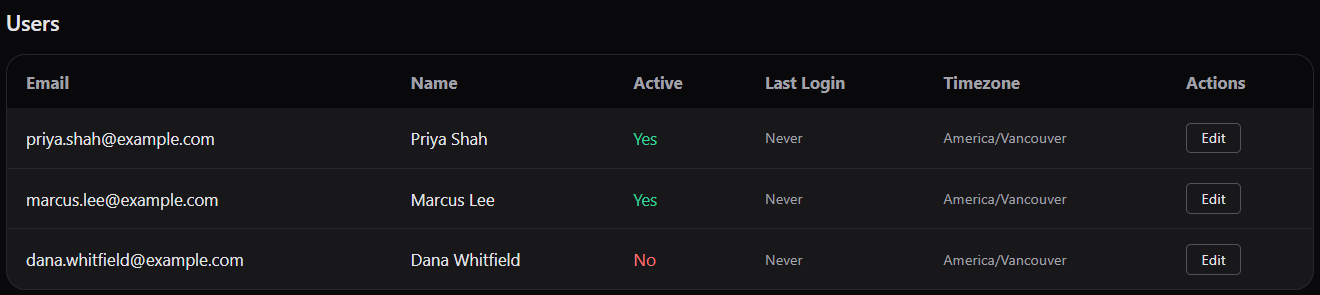
The Users table with active and inactive users.
Create a user
New users do not get a password from you. Pulse emails them a link and they choose their own password.
- On the Pulse Admin page, scroll to Create New User.
- Fill in the form.
- Click Create User.
| Field | Meaning | Validation |
|---|---|---|
| Sign-in address. Stored in lower case. | Required. Must be a valid email address. Must not already exist in Pulse: "User already exists". | |
| Full name | Shown in the header, in audit entries and in acknowledgements. | Required. |
| Timezone | Timezone for displaying times and for evaluating notification schedules. | Defaults to UTC. The user can change it later in their profile. |
| Organization | The organization the user is created in. | Pre-selected when you administer exactly one organization. When you administer several, you must choose one: "Select an organization for the new user". |
When the user is created you see User created successfully! and the following happens:
- The account is Active with the viewer role in the chosen organization. Change the role in the editor if the person needs more (see Edit a user).
- Email notifications are switched on, with a schedule of every day, all day. SMS notifications are switched off.
- Pulse sends a welcome email with the subject Welcome to Pulse, <name> - Set your password and a Set your password button. The email says "This link will expire in 30 minutes." The link can be used once. See Activating your account.
Note
If the link expires before the user opens it, there is no "resend" button. Ask the user to open the sign-in page and use Forgot password; that sends a fresh link that works for accounts that have never set a password. See Signing in and passwords.
Note
A user belongs to one organization when you create them. Contact Lab Monitors support to give a user access to a second organization.
Edit a user
- In the Users table, click Edit on the user's row. The editor opens below the table with the heading Edit User: <name> (<email>).
- Change the fields you need.
- Click Save Changes. The editor re-renders with ✓ User updated successfully! () at the top (the brackets are always empty).
- Click Close to return to the list. The page reloads so the table shows your changes.
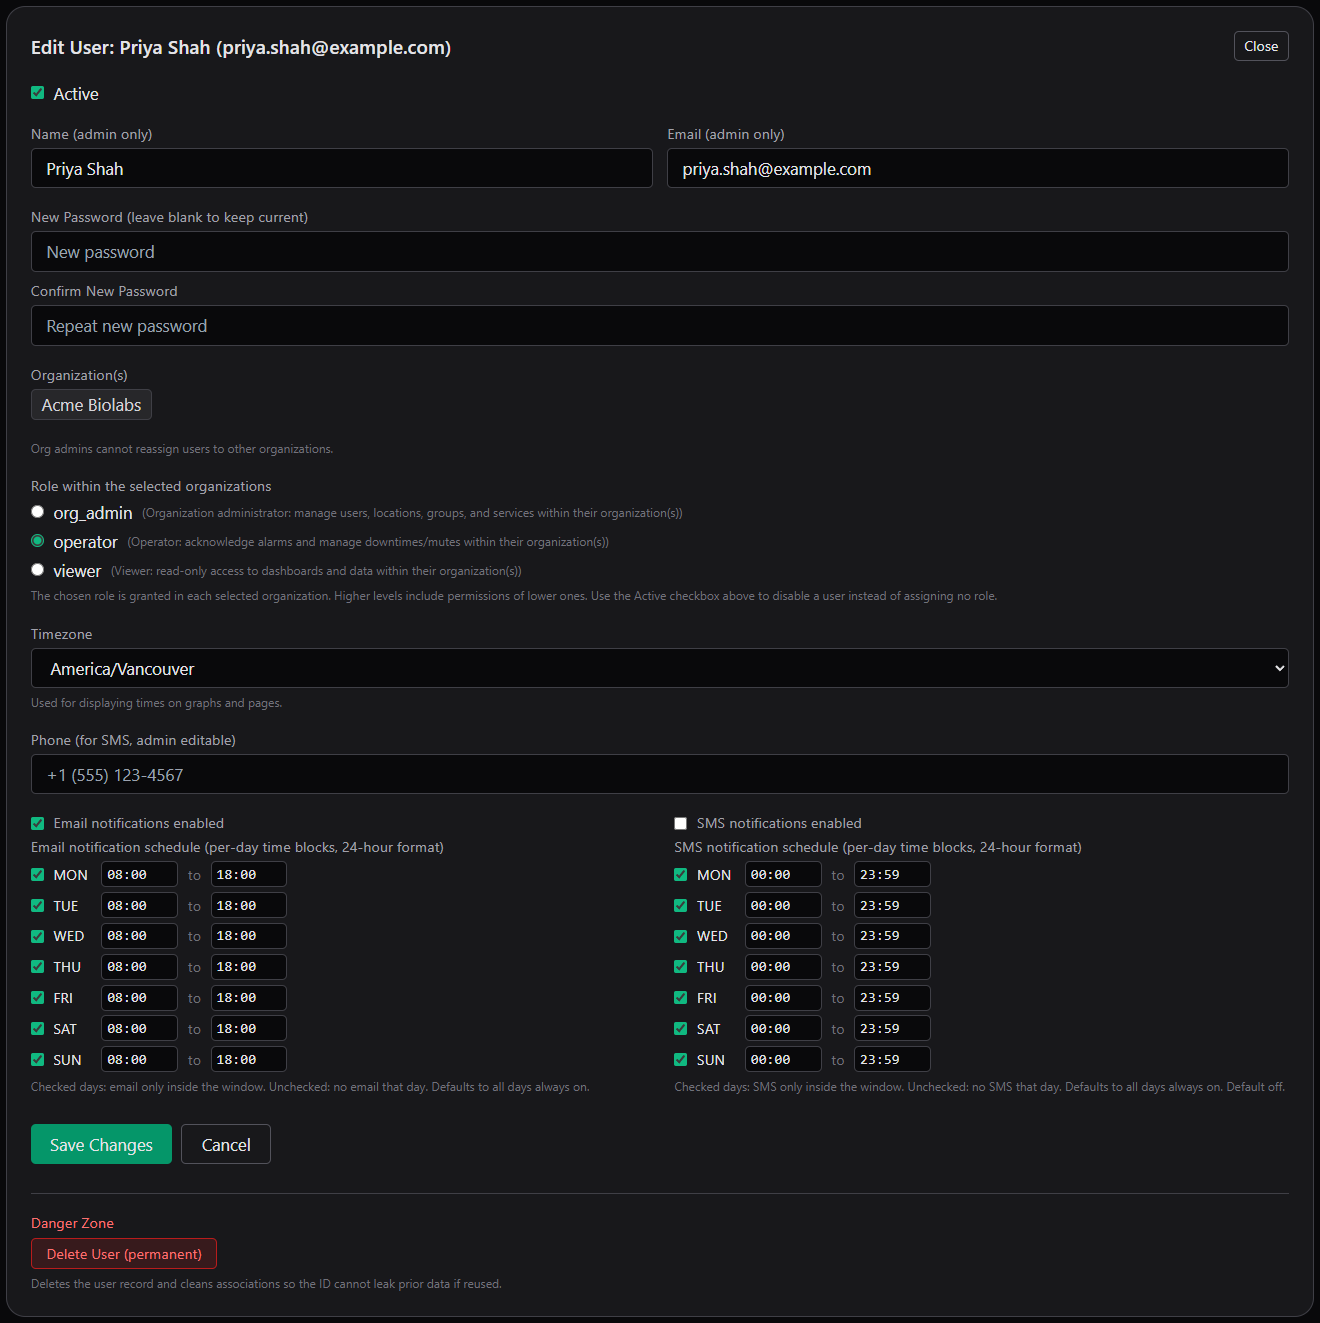
The Edit User editor: role radio buttons, timezone, phone and both notification schedules.
Account fields
| Field | Meaning | Validation and behaviour |
|---|---|---|
| Active | Whether the user may sign in. | Untick to deactivate; see Deactivate a user. |
| Name (admin only) | Full name. "Admin only" means the user cannot change it themselves; you can. | Leave as is to keep the current name. |
| Email (admin only) | Sign-in address. | Leave as is to keep the current address. The address you type is stored exactly as entered. |
| New Password (leave blank to keep current) and Confirm New Password | Sets a new password for the user. | Both fields must match: "Passwords do not match for user <id>." Minimum 12 characters: "Password must be at least 12 characters." Setting a password signs the user out everywhere; they sign in again with the new password. |
| Organization(s) | The organizations the user belongs to, shown as read-only labels. | The form says "Org admins cannot reassign users to other organizations." Contact Lab Monitors support to change a user's organizations. |
| Role within the selected organizations | One of org_admin, operator or viewer, with a short description next to each. | If none is selected the user is saved as viewer. Higher roles include the permissions of lower ones. There is no "no role" option; use Active to disable a user instead. See Roles at a glance. |
| Timezone | "Used for displaying times on graphs and pages." Also the timezone in which the user's notification schedules are evaluated, and in which the date filters of the Alarm History and Audit Log pages are interpreted. | Must be a real timezone; an unknown value is saved as UTC. |
| Phone (for SMS, admin editable) | Mobile number for SMS notifications, stored in international (E.164) format. | Pulse keeps only the digits. A 10-digit number is treated as North American and stored with +1. Other numbers must include their country code, for example +44 20 7946 0000. A number with fewer than 7 digits is discarded and the field is cleared. |
Notification channels and schedules
Each user has two independent channels, Email notifications enabled and SMS notifications enabled, each with its own per-day schedule. These settings decide whether this user is contacted when a service they are a member of (through its notification group) raises an alarm. The user can change the same settings in their own profile.
| Field | Meaning |
|---|---|
| Email notifications enabled | Master switch for email. On by default. |
| SMS notifications enabled | Master switch for SMS. Off by default. SMS also needs a phone number. |
| Email notification schedule / SMS notification schedule | One row per day, MON to SUN. Each row has a checkbox, a start time and an end time in 24-hour HH:MM format. |
How a schedule is applied:
- The channel must be switched on, and the user must be a member of the service's notification group. A schedule on its own does nothing.
- A ticked day means: send on that day only between the start and end time, inclusive. The default is 00:00 to 23:59.
- An unticked day means: send nothing on that day on that channel.
- A window whose start is later than its end (for example 22:00 to 06:00) runs overnight into the next day.
- Times are evaluated in the user's Timezone from the same form.
- A time that is not valid HH:MM is saved as 00:00 to 23:59 for that day.
Warning
Schedules do not queue notifications. If an alarm starts while a user is outside their window, that user does not receive the initial notification. They receive the next repeat only if the alarm is still active once their window opens. See Notifications you receive.
Users who also belong to another organization
If a user holds a role in one of your organizations and also in an organization you do not administer, you can change only their Role in your organization and their notification switches and schedules. Their name, email, Active state, timezone and phone are left unchanged when you save, and setting a password is refused with "You cannot set the password for a user who belongs to other organizations." Contact Lab Monitors support to change those details.
Reset a user's password
You can set a new password for a user at any time: open the editor, type it in New Password and Confirm New Password, and click Save Changes. Tell the user the password by a channel you trust; Pulse does not email it. The change is recorded in the audit log.
Users can also reset their own password with Forgot password on the sign-in page, which emails them a link valid for 30 minutes. This works even for accounts that have never been activated.
Deactivate a user
Deactivating keeps the account and its history but blocks sign-in.
- Click Edit on the user's row.
- Untick Active.
- Click Save Changes.
Effects:
- Any session the user has open ends at their next click, and new sign-ins are refused.
- The user stays in the Users table with Active = No, keeps their role and group memberships, and still appears in group member lists.
- Deactivated users receive no notifications, even if they are in a service's notification group.
- The change is recorded in the audit log as
user.update.
Reactivate a user
- Click Edit on the user's row.
- Tick Active.
- Click Save Changes.
The user signs in with their existing password. If they have forgotten it, set one in the editor or ask them to use Forgot password.
Delete a user
Deleting is permanent. Use it when a person has left and their account should never be used again. If you may need the account later, deactivate it instead.
- Click Edit on the user's row.
- Scroll to Danger Zone at the bottom of the editor.
- Click Delete User (permanent).
- Confirm the prompt: "Really delete this user and clean all their personal data (acks, roles, group memberships, etc.)? This cannot be undone."
Pulse replies User deactivated and anonymized. History is retained for audit; the account can no longer log in. and the Users table refreshes.
What happens:
- All roles and group memberships are removed, and any pending activation or password-reset link is cancelled.
- The email address, name, phone and password are wiped and replaced with placeholders, so the user's original email address can be reused for a new account.
- The account is deactivated. Any open session ends immediately.
- Audit entries, acknowledgements and other history the person created are kept and remain attributed to the deleted account.
- The user disappears from your Users table because they no longer hold a role in your organization.
- The deletion itself does not appear in your organization's audit log; the last entries for the account are the
user.updaterows written before it.
You cannot delete your own account: "You cannot delete your own account from here." A deleted user cannot be restored; create a new account instead.
Groups
Groups are listed in the Groups table on the Pulse Admin page, ten per page.
| Column | Meaning |
|---|---|
| Org | The organization the group belongs to. |
| Name | Group name. |
| Type | asset or user. |
| Members | Number of members, shown as "N assets" or "N users". |
| Actions | Edit opens the group editor below the table; Delete removes the group. |
The two kinds of group
| Type | What members are | What it is used for |
|---|---|---|
| User Group | Users who hold a role in the group's organization. | The Notification group of a service. When a service's alarm needs to be sent, Pulse emails and texts the active members of that group, subject to each member's channel switches and schedules. A service with no notification group never notifies anyone. |
| Asset (device) Group | Assets of the group's organization. | Labels. The group names of a service's linked asset appear on its dashboard card and service page, and typing a group name into the dashboard search finds those services. Asset groups have no effect on notifications. |
A group's type and organization are fixed when it is created.
Create a group
- On the Pulse Admin page, expand Add new group.
- Fill in the form.
- Click Create Group. You see Group created successfully!
| Field | Meaning | Validation |
|---|---|---|
| Organization | The organization the group belongs to. | Required. |
| Name | Group name. | Required. A blank name is refused with "Invalid group data". |
| Type | Asset (device) Group or User Group. | Required. Cannot be changed later. |
| Description (optional) | Free text. | None. |
Edit a group and manage members
- In the Groups table, click Edit. The editor opens with the heading Edit Group: <name> (<type>).
- To rename or describe the group, change Name or Description (optional) and click Save Changes. You see Group updated successfully! A blank name is refused with "Name is required."
- To add a member, pick one from the list under Add Member and click Add. The list updates immediately; you do not need to click Save Changes for membership changes.
- To remove a member, click remove next to it under Current Members.
- Click Close or Cancel to leave the editor.
The Add Member list contains only eligible items that are not already members: for a user group, users who hold a role in the group's organization; for an asset group, the organization's assets. Users and assets from other organizations can never be added. Adding and removing members is recorded in the audit log as group.member.add and group.member.remove.
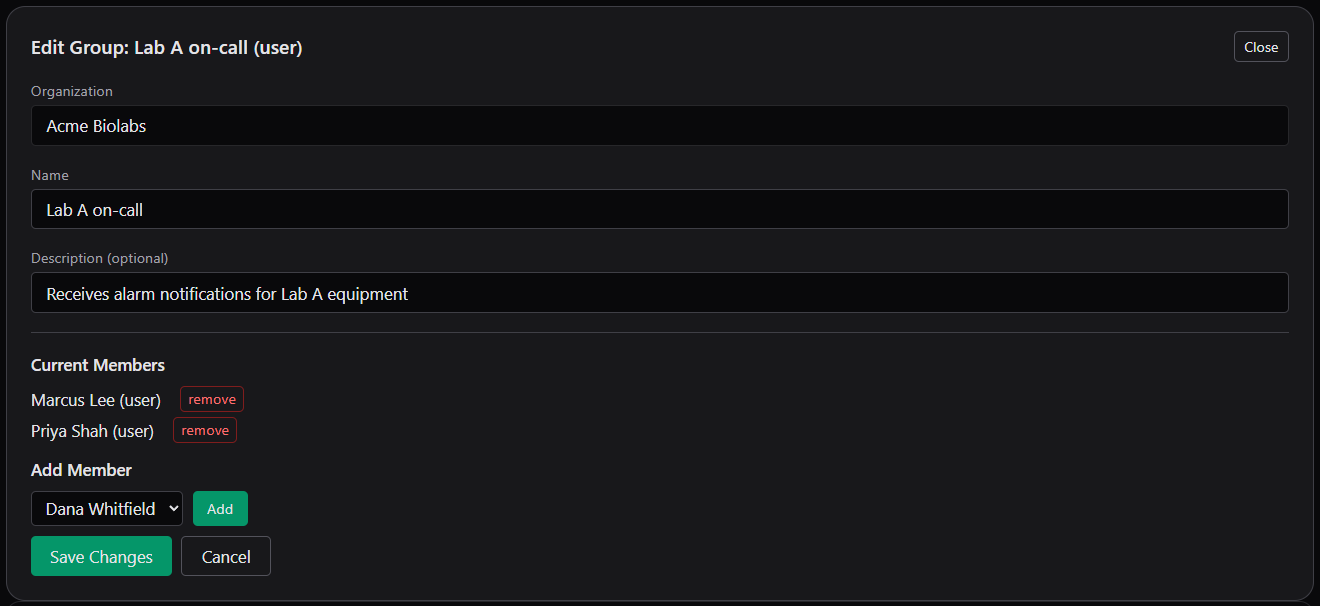
The Edit Group editor for a user group, with Current Members and the Add Member list.
Tip
Membership changes are recorded in the audit log because they change who is paged. Check the Current Members list after editing a notification group.
Use a user group as a service's notification group
The group is chosen on the service page, not in the group editor.
- Open the service from the dashboard and open its edit section.
- Under Notification group (optional user group for targeting), the current choice is shown as Currently assigned: <group> or None.
- Select the user group and save the service.
See Alarm limits and policies for the full service edit form and Notifications you receive for what members are sent.
Delete a group
- In the Groups table, click Delete on the group's row.
- Confirm "Delete this group?"
The group and its memberships are removed. Users and assets themselves are not affected.
A user group that is the notification group of one or more active services cannot be deleted. The Groups table shows:
Can't delete: this is the notification group for N active service(s) (<service names>). Pick another notification group for them first.
Change the notification group on each listed service (or set it to None) and try again. Archived services that still point at the group do not block deletion; they are detached from it automatically. See Archiving and restoring services.