Devices
Who can do this: organization administrators. Operators and viewers cannot open the Devices page.
The Devices (Hardware) page lists the physical LoRaWAN sensors that belong to your organization. Open it from the Admin hub (Admin in the header, then Devices).
A device is identified by its Device EUI. On its own a device does not appear on the dashboard: readings reach the dashboard only after you map one of the device's channels to a service. See Services and channel mapping.
Devices are provisioned into ChirpStack, the LoRaWAN network server that Lab Monitors operates for you. You never sign in to ChirpStack yourself, but some messages on this page mention it.
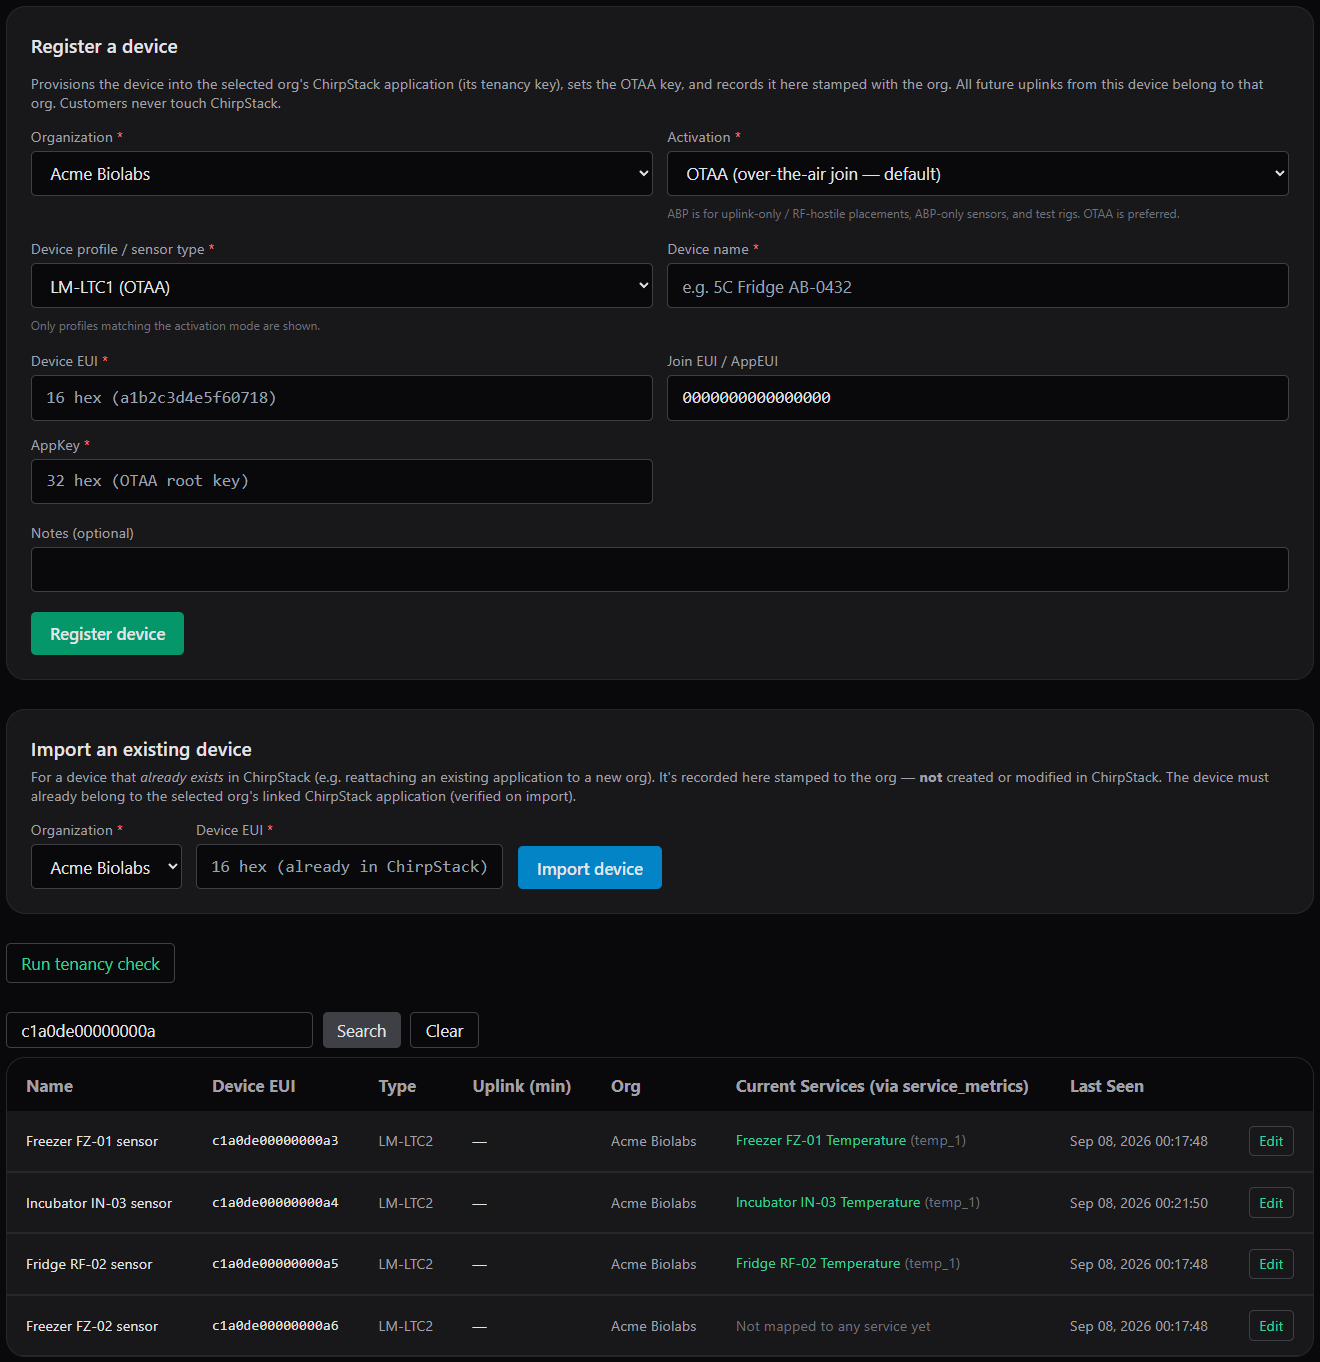
The Devices page: the Register a device form above, the device table below.
The device list
The table shows 15 devices per page. Use Search by device EUI to filter by Device EUI or device name (the search box matches both), then Search; Clear removes the filter.
| Column | Meaning |
|---|---|
| Name | The device name you gave it. A red retired badge means the device has been decommissioned. |
| Device EUI | The 16-character hardware identifier. |
| Type | The device profile (sensor type) the device was registered with. |
| Uplink (min) | The reporting interval, in minutes, last commanded from Pulse. Shows — if you have never sent a Set uplink interval downlink. When a value is shown, the services on the asset linked to this device are marked STALE after twice this interval; see Stale detection follows the uplink interval. |
| Org | The organization the device belongs to. |
| Current Services (via service_metrics) | The services this device's channels are mapped to, with the channel name in brackets. Shows Not mapped to any service yet for an unmapped device. |
| Last Seen | The time of the device's most recent reading, in your timezone. Shows Never until the first reading arrives. |
| (unlabelled last column) | The Edit button opens the device editor (see Edit a device). |
Register a device
Registering creates the device in ChirpStack under your organization, stores its keys, and records it in Pulse. Use this for a new sensor that has never been provisioned.
The Register a device form is shown only when your organization has a ChirpStack application. If the page says No organization has a ChirpStack application yet, or your organization is listed after No application (excluded), contact Lab Monitors support to link an application to your organization before registering devices.
Tip
Choose the device profile that matches your hardware exactly. The list contains every profile available, and a device registered with the wrong profile joins the network but produces no readings. See Supported sensors and channels for the profile names. Contact Lab Monitors support if the profile you need is not listed.
Fields
Fields marked * are required.
| Field | Meaning | Validation |
|---|---|---|
| Organization * | The organization that will own the device. A device belongs to exactly one organization and cannot be moved afterwards. | Only organizations with a ChirpStack application are listed. |
| Activation * | OTAA (over-the-air join — default) or ABP (static session keys). OTAA is preferred. The form's own help text says ABP is for uplink-only or RF-hostile placements, ABP-only sensors, and test rigs. | Changing the activation switches which key fields are shown and filters the profile list. |
| Device profile / sensor type * | The sensor type. Only profiles matching the chosen activation mode are shown. | Must support the chosen activation mode. |
| Device name * | A label for the sensor, for example 5C Fridge AB-0432. |
Cannot be blank. |
| Device EUI * | The hardware EUI printed on the sensor. | 16 hexadecimal characters. Spaces, colons and dashes are ignored; case does not matter. |
| Join EUI / AppEUI (OTAA) | The join EUI from the sensor's label. Defaults to sixteen zeros. | Copy it exactly from the label; the form does not check its format. |
| AppKey * (OTAA) | The OTAA root key from the sensor's label. | 32 hexadecimal characters. |
| DevAddr * (ABP) | The device address. | 8 hexadecimal characters. Must not be in use by another active device. |
| NwkSKey * (ABP) | The network session key. | 32 hexadecimal characters. |
| AppSKey * (ABP) | The application session key. | 32 hexadecimal characters. |
| Notes (optional) | Free text, shown in the device editor. | None. |
Steps
- Choose the Organization.
- Choose the Activation mode. The OTAA fields (Join EUI / AppEUI, AppKey) or the ABP fields (DevAddr, NwkSKey, AppSKey) appear accordingly.
- Choose the Device profile / sensor type.
- Enter the Device name and Device EUI, then the keys for the chosen activation mode.
- Click Register device.
On success the page shows Device <eui> registered and provisioned in ChirpStack. and the device appears in the table with Last Seen = Never and Not mapped to any service yet. The keys you entered are stored encrypted. The registration is recorded in the audit log as device.register.
If registration fails, nothing is left behind: a device that could not be recorded in Pulse is removed from ChirpStack again.
Error messages
| Message | What to do |
|---|---|
| Device EUI must be 16 hex characters / AppKey must be 32 hex characters / DevAddr must be 8 hex characters / NwkSKey must be 32 hex characters / AppSKey must be 32 hex characters | Check the value against the sensor label. Only the characters 0–9 and a–f count. |
| Device name is required | Enter a name. |
Device <eui> is already registered |
The device already exists in Pulse. Find it in the table. This check runs before the profile check, so a wrong profile on an existing EUI shows this message instead. |
Device <eui> is decommissioned — reactivate it from the Devices list instead of re-registering |
The device was retired. Contact Lab Monitors support to reactivate it. |
DevAddr <addr> is already in use by another active device |
Choose a different DevAddr. |
| Selected profile is ABP-only — choose an OTAA profile or switch to ABP / Selected profile is OTAA — choose an ABP profile or switch to OTAA | The profile and the activation mode do not match. |
| Selected device profile could not be loaded from ChirpStack / ChirpStack device provisioning failed (see logs) / Failed to record device (ChirpStack rolled back) / ChirpStack is not configured — cannot provision devices / any message saying an encryption key is not configured | A platform-side problem. Contact Lab Monitors support. |
'<org>' has no ChirpStack application — link one on the Orgs page first / That organization is not in your scope / Organization not found |
Contact Lab Monitors support to link an application to your organization. |
After registration
- Power on the sensor. Once its first reading arrives, Last Seen shows the time and the device's channels become available for mapping.
- Map the channels you want to monitor to a service on the Services page. See Map a channel to a service.
- Set alarm limits on the service. See Alarm limits and policies.
Import an existing device
Use Import an existing device for a device that already exists in ChirpStack under your organization's application but is not yet recorded in Pulse — for example a device Lab Monitors provisioned for you. Importing records the device in Pulse; it does not create or change anything in ChirpStack.
| Field | Validation |
|---|---|
| Organization * | The device must already belong to this organization's ChirpStack application. |
| Device EUI * | 16 hexadecimal characters. |
Click Import device. On success the page shows Device <eui> imported from ChirpStack and attached to its org. The device's name and profile are taken from ChirpStack. The import is recorded in the audit log as device.import.
| Message | Meaning |
|---|---|
Device <eui> is already in Pulse |
Nothing to import; find the device in the table. |
Device <eui> does not exist in ChirpStack — use Register, not Import |
The device has never been provisioned. Register it instead. |
| Device belongs to a different ChirpStack application — import it into the matching org | The device is provisioned under another organization. Contact Lab Monitors support if you believe it should be yours. |
| ChirpStack lookup failed (see logs) / ChirpStack is not configured / Failed to record imported device | A platform-side problem. Contact Lab Monitors support. |
Note
Import does not capture the device's keys, so an imported device that is later decommissioned cannot be reactivated from stored keys. Contact Lab Monitors support if an imported device needs to be brought back after decommissioning.
Edit a device
Click Edit on a device row. The editor opens inline under the row and has three parts: device details, Downlinks, and Calibration. A decommissioned device also shows a Decommissioned banner with the retirement date and time (UTC) and the reason, and its Downlinks section says No downlink commands defined for this device's profile.
| Field | Meaning |
|---|---|
| Device name (this sensor's label) | The sensor's label. Blank is allowed. |
| Sensor type / profile (read-only) | The device profile cannot be changed in Pulse. Contact Lab Monitors support to change a device's profile. |
| Notes | Free text. |
Click Save Changes. The editor shows Device saved. and the change is recorded in the audit log as device.update. Close or Cancel closes the editor without reloading the page; refresh the page to see the new name in the table.
The Calibration section loads automatically inside the editor. See Calibration.
Downlinks
The Downlinks section lists the commands available for the device's profile, one form per command. Last interval: shows the uplink interval last commanded from Pulse, or —.
For all Lab Monitors sensor profiles the available command is Set uplink interval:
| Control | Meaning |
|---|---|
| Set uplink interval value | The reporting interval in minutes; the form says minutes (2–120). The field is pre-filled with the last commanded interval, or 2. Under the form, fPort 2 · unconfirmed · op 01 shows how the command is sent. |
| Send | Queues the command. |
You do not choose an fPort or encode a payload; Pulse does that for you.
Send a downlink
- Enter the value.
- Click Send and confirm the prompt Send 'Set uplink interval' downlink to this device? This commands the hardware on its next downlink window.
On success the editor shows Queued '<label>' (payload <hex>, fPort <n>, unconfirmed). Applies on the device's next downlink window. The Uplink (min) column and Last interval: update immediately to the commanded value. The command is recorded in the audit log as device.downlink.
Note
A LoRaWAN device only receives downlinks shortly after it sends an uplink, so the new interval takes effect after the device's next report. The command is sent unconfirmed: Pulse shows the value you commanded, not a confirmation from the device. Watch Last Seen to verify the new cadence.
Stale detection follows the uplink interval
Once a device has an Uplink (min) value, every service on an asset linked to that device is marked STALE when no reading has arrived for twice that interval, and the service's Stale after (minutes) setting is no longer used for it (except that 0 still turns stale detection off). Lengthening the interval therefore does not make the service flap between STALE and OK, and you do not need to change Stale after (minutes) afterwards. Shortening the interval makes stale detection faster in the same way. See The stale threshold.
Devices you have never commanded
Until the first Set uplink interval command, Pulse judges the device's services on Stale after (minutes) alone. For a device on its factory reporting interval, set that value on every service that uses the device to at least 2–3 times the interval, or send the interval once so that Pulse knows it. See Notification settings.
| Message | Meaning |
|---|---|
| value must be a whole number / value must be between 2 and 120 | Correct the value. Decimals such as 2.5 count as not whole. |
Command '<key>' is not available for this device's profile '<profile>'. |
The command is not defined for this profile. Contact Lab Monitors support. |
| No downlink commands defined for this device's profile. | The profile has no commands. Contact Lab Monitors support to add downlink commands to the profile. |
| ChirpStack is not configured. / ChirpStack rejected the downlink (see logs). | A platform-side problem. Contact Lab Monitors support. |
Run a tenancy check
Run tenancy check compares every device in your organization with ChirpStack and reports devices whose network-server record disagrees with Pulse. It is a safety check; you do not need to run it routinely.
Possible results:
- ✓ All N device(s) in scope agree with ChirpStack — every device's application matches its Pulse organization. Nothing to do.
- A red heading ⚠ N of M device(s) disagree with ChirpStack: followed by a table (Device, Pulse org, Finding) with one row per finding:
- ChirpStack app
xxxxxxxx…≠ org appyyyyyyyy…— moved in ChirpStack outside Pulse — the device was moved to a different application. - registered in Pulse but not found in ChirpStack — the device no longer exists on the network server. Every decommissioned (retired) device in your organization is listed with this finding, because retiring removes it from the network server; you can ignore those rows.
- ChirpStack app
- ChirpStack is not configured — cannot run the tenancy check. or Tenancy check failed (see logs) — is ChirpStack reachable? — the check could not run.
Any finding on an active device must be resolved by Lab Monitors. Contact Lab Monitors support and quote the Device EUI and the finding text. Until it is fixed, do not rely on readings from the affected device.
Actions that need Lab Monitors support
The following are not available to organization administrators:
- Decommission (retire) a device. A retired device is removed from the network server and stops reporting; its readings and alarm history are preserved. A device must be unmapped from every service before it can be retired. Contact Lab Monitors support to decommission a device.
- Reactivate a retired device. Contact Lab Monitors support to reactivate a device. A retired device cannot be mapped to a service (Device is decommissioned and cannot be mapped. Reactivate it first.) and cannot be registered again.
- Permanently delete a device. Only a device with no readings, no alarm history, no service mapping and no asset link can be deleted. Contact Lab Monitors support to delete a device.
- Change a device's profile (sensor type). Contact Lab Monitors support to change a device's profile.
- Move a device to another organization. Contact Lab Monitors support.
- Create or change device profiles, downlink commands, gateways, or your organization's ChirpStack application. Contact Lab Monitors support.